Tractor PTO Problems: Why It Won’t Engage and How to Fix It
Some links here are affiliate links — if you buy through them, Dirt Road Mechanic earns a commission at no extra cost to you. It never affects which parts or tools we recommend. Full disclosure.
When the PTO quits, whatever’s attached to it quits too — mid-row with a bush hog, halfway through a field with a tiller. What makes it frustrating is that the same symptom traces back to five different systems at five wildly different price points, and most owners start with the expensive one.
Five Systems, One Symptom
The same symptom — PTO won’t engage — can mean a blown fuse, a faulty safety interlock switch, a bad solenoid, a worn electric clutch, or a hydraulic pressure issue. Those five things require completely different repairs at completely different price points. A blown fuse costs nothing. A new electric clutch runs $550-900 installed at a dealer. Getting to the right answer without doing the work in the right order is how farmers end up replacing parts they didn’t need. If you are trying to read what the machine is telling you before you start testing, our breakdown of tractor PTO symptoms covers which noises and behaviors point where.
Farmers on TractorByNet run into this constantly — a JD 2025R owner posted about his PTO stopping mid-job with the indicator light still on. That detail is everything. If the PTO light comes on but nothing engages, you’re chasing an electrical problem downstream of the switch — usually a solenoid or clutch coil. If the light doesn’t come on at all, you’re chasing the switch or a safety interlock first. One detail, two completely different diagnostic paths.
The Diagnostic Split That Changes Everything
Before you touch anything, ask yourself one question: Does the PTO indicator light come on when you engage the switch?
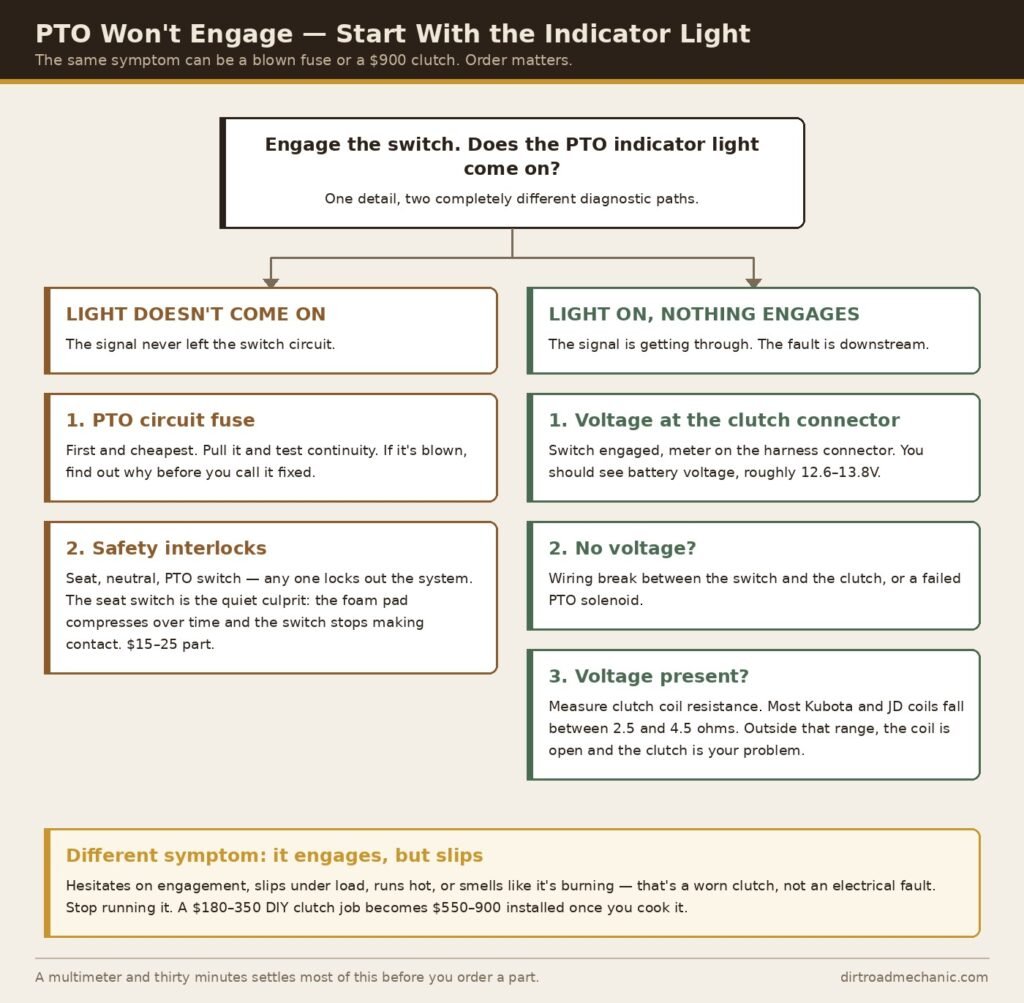
If yes — light on, nothing engages: The switch and safety interlocks are working. The signal is getting through. Your problem is between the switch and the clutch — most likely the PTO solenoid, the clutch coil, or a wiring issue between the two. Pull out a Fluke 115 multimeter and test for voltage at the PTO clutch connector with the switch engaged. You should see battery voltage — 12.6-13.8V. No voltage means you’ve got a wiring break or a bad solenoid. Voltage present but clutch not engaging means the clutch coil is open — measure coil resistance; it should fall between 2.5-4.5 ohms on most Kubota and JD models. Outside that range, you’ve found your problem.
If no — light doesn’t come on: The signal never left the switch circuit. Start with the fuse for the PTO circuit — it’s the first thing to check and the cheapest fix on the list. If the fuse is good, you’re looking at a safety interlock switch. Most tractors have at least three: a seat switch, a neutral/transmission switch, and a PTO engagement switch. Any one of them being faulty will prevent the PTO from activating. Test each one for continuity with your multimeter.
A common concern on MyTractorForum is owners replacing the PTO switch itself when the real culprit is a seat switch that’s failed — the foam pad underneath compresses over time, the switch stops making contact, and the safety system locks out the PTO. It’s a $15-25 part, and it fixes the problem more often than most people expect.
PTO Problems by Brand
Kubota compact tractors are among the most documented for PTO problems in the forums, and the pattern is consistent: safety interlock failures and worn electric clutches account for the large majority of won’t-engage complaints. Both are diagnosable with a multimeter in about thirty minutes and usually fixable for under $50. The remaining cases — hydraulic issues and actual clutch pack failures — are the expensive ones, but they’re the minority. Start cheap, work your way up. Our Kubota repairs guide covers the broader Kubota diagnostic approach.
John Deere compact tractors — the 1025R and 2025R especially — have a documented PTO solenoid failure pattern. The solenoid fails, and the PTO just stops working mid-job with no warning. The light comes on, the switch works fine, but nothing engages. Replacement solenoids run $80-150, and the swap is straightforward once you locate the unit. Green Tractor Talk has active threads on this going back several years — it’s a known issue on both models. For broader JD electrical diagnostics, our tractor electrical problems guide covers the full process.
Mahindra and other brands — the most common PTO issue across less-documented brands is linkage adjustment. The mechanical connection between the lever and the control valve gets knocked out of adjustment, and the PTO either won’t fully engage or drags and overheats. Check the linkage rod before doing any electrical diagnosis — it takes five minutes and occasionally saves you an hour of electrical troubleshooting on a problem that’s purely mechanical.
When It Is the Clutch: What That Actually Looks Like
Not every tractor PTO problem is electrical. If the PTO engages but slips under load, overheats, or makes a burning smell, you’ve likely got a worn clutch pack or an electric clutch that’s failing mechanically rather than electrically.
Symptoms of a failing PTO clutch:
- Engages slowly or hesitates before full engagement
- Slips when you put a heavy implement under load
- Gets hot during normal operation
- Makes a burning smell after running
If you’re seeing these symptoms, don’t keep running it. Continued use with a slipping clutch accelerates wear and turns what might be a $180-350 DIY clutch job into a full replacement at $550-900 installed. Our tractor clutch repair guide covers clutch diagnosis and replacement in detail. PTO clutch wear often starts with running a cutter that’s too big for the tractor — here’s how to size a bush hog by PTO horsepower.
The Order I’d Check These In
PTO problems reward a methodical approach and punish guessing. Here’s the order before you spend anything:
Step 1 — Check the fuse. The PTO circuit fuse is usually in the main fuse block. Pull it and test continuity. If it’s blown, replace it and find out why it blew before calling it fixed.
Step 2 — Test safety interlock switches. Seat switch, neutral switch, PTO switch. Any one of them can lock out the whole system. Test each for continuity with your multimeter.
Step 3 — Check voltage at the clutch connector. If the interlocks are fine and the light comes on, test for battery voltage at the clutch harness connector. No voltage means wiring or a solenoid. Voltage present means test the clutch coil resistance.
Step 4 — Inspect the linkage. On mechanical PTOs, check the physical connection between the lever and the valve. A bent rod or disconnected cotter pin is a five-minute fix.
Step 5 — Grease the PTO shaft and splines. If the clutch checks out and engagement is stiff or noisy, the PTO shaft splines may need lubrication. John Deere HD lithium grease applied with a pistol-grip grease gun and LockNLube coupler handles this — the coupler gets into tight spline fittings that a standard tip won’t reach. Also, apply dielectric grease to the clutch harness connector when you reassemble it to prevent corrosion from causing the same problem again. On John Deere machines specifically, shaft and u-joint work has its own procedure — see our guide to John Deere tractor PTO shaft repair.